How to Achieve Stunning 3D Nails
The beauty industry is no stranger to innovation and creativity, and one trend capturing the imagination of nail professionals is 3D nail art. More than just a trend, 3D nail designs have become a means of personal expression, transforming ordinary manicures into extraordinary works of art. Mastering this technique not only elevates your nail art game but adds that sought-after wow factor to any manicure. Dive into our 3D nail designs tutorial and unlock the secrets to these eye-catching creations.
What Are 3D Nail Designs?
The Basics
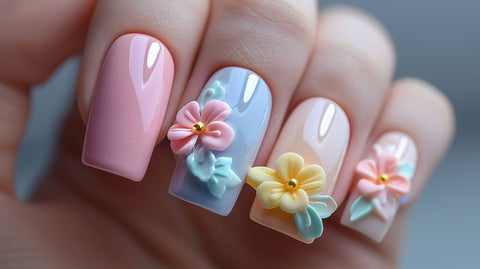
3D nail designs are created by adding various embellishments and decorations to your nails, giving them a three-dimensional effect. These designs can range from simple and subtle to bold and intricate, depending on your personal preference.
Materials Needed
To achieve stunning 3D nails, you'll need a few key materials:
- Nail polish in your desired colour(s)
- 3D nail decorations (such as rhinestones, studs, pearls, etc.)
- Nail glue and top coat
- Tweezers or a dotting tool
- A small brush or toothpick for precision
How to Create 3D Nail Designs
Step 1: Prep Your Nails
Before you begin, make sure your nails are clean and free of any old polish. Trim and shape your nails to your desired length and apply a base coat to protect your natural nails.
Step 2: Apply Your Base Colour
Choose a base colour for your nails and apply two coats for full coverage. Allow the polish to dry completely before moving on to the next step.
Step 3: Choose Your 3D Decorations
There are endless options when it comes to 3D nail decorations. You can choose from rhinestones, studs, pearls, flowers, and more. Get creative and mix and match different decorations for a unique look.
Step 4: Apply the Decorations
Using tweezers or a dotting tool, carefully place the 3D decorations onto your nails. You can create a pattern or design, or simply place them randomly for a more abstract look. Be sure to leave some space between the decorations to avoid overcrowding.
Step 5: Secure with Nail Glue or Top Coat
Once you have your decorations in place, you'll need to secure them to your nails. You can use a small amount of nail glue or a top coat to do this. If using nail glue, be sure to apply it sparingly to avoid any excess glue showing. If using a top coat, apply a generous amount and gently press down on the decorations to secure them in place.
Step 6: Add Finishing Touches
To add even more dimension to your 3D nails, you can use a small brush or toothpick to add details or accents with nail polish. This could be adding dots, lines, or other designs to enhance your 3D decorations.
Step 7: Seal with Top Coat
Once you're happy with your 3D nail design, seal it with a top coat to protect your nails and keep the decorations in place. Be sure to apply the top coat carefully to avoid smudging any of your designs.
Tips for Achieving the Best 3D Nails
- Start with a clean and smooth base. Make sure your nails are free of any old polish and are trimmed and shaped to your liking.
- Use a base coat to protect your natural nails and prevent staining.
- Be patient and take your time. 3D nail designs can be intricate and require precision, so don't rush through the process.
- Experiment with different decorations and designs to find what works best for you.
- Use a top coat to seal and protect your 3D nail design.
- Have fun and get creative! 3D nails are all about expressing your personal style and having fun with your nails.
Where to Find 3D Nail Decorations
You can find 3D nail decorations at most beauty supply stores or online. You can also find 3D nail decorations at your local nail salon.
3D nail designs are a fun and creative way to add some dimension and personality to your nails. With the right materials and a little patience, you can achieve stunning 3D nails that will make your nails stand out from the crowd. So go ahead and give it a try – your nails will thank you!